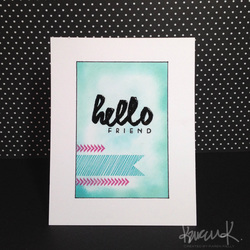
I know--elephants don't exactly scream 'Easter' but here's a card I'm sending to my niece in California for Easter. One would *think* that I would have my TWIN sister's birthday card ready and in the mail so that she would get it on time for our birthday later this week but that would just make too much sense. So, instead she will get a late birthday card and Kellie will luck out and get an Easter goody or two along with this card. My sister was telling me that the last card I sent her with some other stuff was a bit of a shocker to my niece because there was actually nothing in the box for her. You see, 99.99% of the time they receive a package from me, it mainly stuff for my niece and maybe something thrown in for my sister. So, I would feel really bad sending something for only Kim twice in a row so don't worry, Kellie--Emo will not disappoint you again!
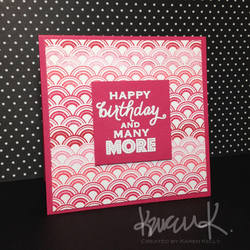
I am playing along with Simon's Wednesday Challenge to make an Easter card or a card featuring sweets. Well, my niece is pretty sweet so there ya go. Basic Grey products are being featured this week so I thought it would be the perfect opportunity to ink up my brand new Capture Prism background stamp which is part of Hero Art's Basic Grey collection--absolutely love it! I got a BUNCH of Hero Arts goodies from Jennifer McGuire as a 'thank you' for helping her with her swatch book files so I'm in heaven right now :-) Thanks to my friend Kim for these CA-YUTE elephant stamps and die cuts from Lawn Fawn--oh my they're adorable. Thought they would make for a sweet card for my little KellBelle. I stamped them with Adirondack ink and colored them in with Copics. I then inked up the background on the card panel using a sponge dauber with ink and Simon's Falling Hearts stencil--a nice subtle detail. I have yet to try embossing paste with any of my stencils so maybe that will be a goal for later this week. I used the folded banner die from SSS and the sentiment was a perfect fit. I mounted that onto my stamped panel and then popped that entire piece up using Stampin' Up! dimensionals. I adhered the smaller elephant with Tombow Mono adhesive and then popped the other elephant up for some added dimension. This card was a fun one to make!
I am playing along with Simon's Wednesday Challenge to make an Easter card or a card featuring sweets. Well, my niece is pretty sweet so there ya go. Basic Grey products are being featured this week so I thought it would be the perfect opportunity to ink up my brand new Capture Prism background stamp which is part of Hero Art's Basic Grey collection--absolutely love it! I got a BUNCH of Hero Arts goodies from Jennifer McGuire as a 'thank you' for helping her with her swatch book files so I'm in heaven right now :-) Thanks to my friend Kim for these CA-YUTE elephant stamps and die cuts from Lawn Fawn--oh my they're adorable. Thought they would make for a sweet card for my little KellBelle. I stamped them with Adirondack ink and colored them in with Copics. I then inked up the background on the card panel using a sponge dauber with ink and Simon's Falling Hearts stencil--a nice subtle detail. I have yet to try embossing paste with any of my stencils so maybe that will be a goal for later this week. I used the folded banner die from SSS and the sentiment was a perfect fit. I mounted that onto my stamped panel and then popped that entire piece up using Stampin' Up! dimensionals. I adhered the smaller elephant with Tombow Mono adhesive and then popped the other elephant up for some added dimension. This card was a fun one to make!


_thumb.jpg)


_thumb.jpg)


 RSS Feed