Stampin' with Karen
  • Blog
  • Store

Blog Hop for the Cox Family

2/3/2016

26 Comments

 
Picture
Thank you so much for joining us all for this blog hop honoring a wonderful gal and her family.  Ann and I have been friends since college--if you've popped over to the GoFundMe page yet, you've already heard about our friendship, but if not--I'll give you the shortened version that she and I reconnected through stamping about 12 years ago and have been crafting together ever since.  As you can tell by looking at either of our blogs, we're not quite as active in crafting as we'd like to be these days!  
​
Picture
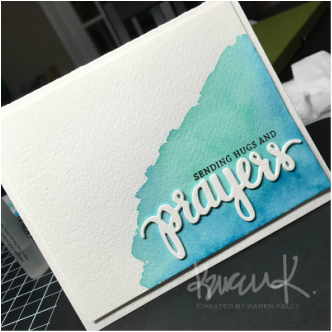
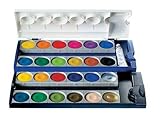
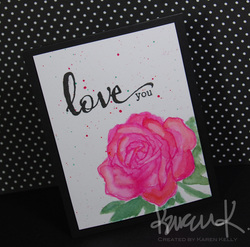
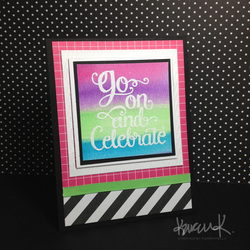
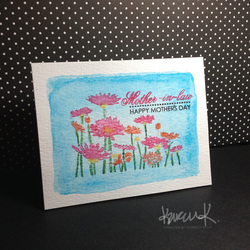
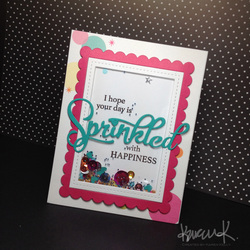
I brought my blog back to life with this project to try and help bring awareness to the campaign that was created for her.  I used one of my favorite impulse purchases--the Prayers Stamps & Dies by Hero Arts for Simon Says Stamp!  This little set is just perfect for that card you need to get out quickly because the die and the sentiments pretty much do all the work themselves.  I used Arches Watercolor Paper and my Kuretake watercolors for a quick painted background and then I adhered several layers of the 'prayers' die together to pop up on the card front.  I used some dimensional tape to adhere that layer onto my card base and called it a day!  I considered adding some sequins or a little bling but I really loved the clean design and decided to leave it alone.  I have a tendency to not know when to stop with embellishments so I figured less was more here.

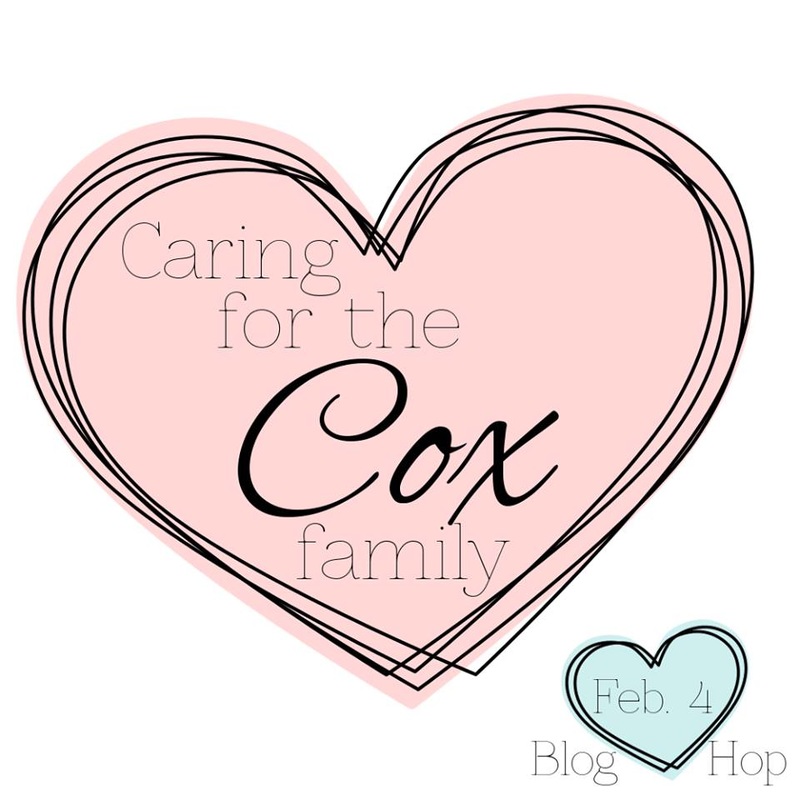
Now, let's get back to Blog Hop business--Ann's family has been through a lot and could truly use your help.  We hope that you will enjoy seeing some of the projects that we've all created and enter for a chance to win some great prizes along the way. If you are in a position to contribute financially, that is great though we understand not everyone can do so which is why there is another way that you can be entered for the prize drawing.  You can be entered into the prize drawing simply by leaving comments on blogs along the way and/or by making a donation.  Winners will be posted on Ashley's blog on February 11th which should give people plenty of time to hop along and get to all of the posts.  

Hopefully you've already popped by Ashley's blog where our hop began, but if not, be sure to check it out!
And then be sure to hop on over to Tenia's blog for another fabulous project!

Be sure to visit GENEROUS AND AWESOME prize sponsors (who are all donating $50 gift certificates for us to give away) as well!
Lawn Fawn 
Cas-ual Fridays 
Sugar Pea Designs 

Full list of Blog Hop Participants
Ashley
Karen (you're here!)
Tenia
Amy
​JoLynn
Rae
Susan
​
Lawn Fawn
Kim
Sankari
Lisa
Angie
Stacey
Lynnette
Heather
Cas-ual Fridays

26 Comments

Coming Soon!

1/30/2016

1 Comment

 
My blog will be resurrected in honor of a good friend--hope you can join us on February 4th for a Blog Hop to raise funds for Ann and her family!  Stay tuned!
Picture
1 Comment

Watercolor Background

5/20/2014

 
Picture
Check out my new 'blinkie' over on my sidebar.  I thought this would be a fun project for my students (I teach a 7th grade tech class) so I made one for my blog and will be having them design their own blinkies for their student web pages.  I think they'll have fun doing it--at least I hope they will!  My position was cut for next year which is a complete bummer but I guess that leaves me more time to stamp :-).  Since I need to be able to afford all of this stuff, I am praying for some cards to fall into place so that I will have a job next year.  My husband told me he wasn't too worried seeing I always manage to come up with something and he's right--I'll figure something out!

Picture
Jennifer Rzasa showed a really cool card in the online watercolor class I am taking and this would be my failed attempt.  Don't get me wrong--I like the funky, bright colors I have going on here BUT it's clear I didn't quite get the same look that she did.  My guess is that I didn't have enough water on the paper and/or brush because my colors really didn't blend OR the fact that I used my OPAQUE watercolors...uhm...ya.  So the background was painted and then table salt added to give some unique texture as the painting dried--my salt didn't seem to do much of anything so I will be trying this again with more water and maybe different paints.  

Picture


Here was another attempt where I used more water--you can definitely see where the salt affected the coloring.  I still think the paint was still too dry or something in some areas as you can see distinct brush lines--especially with the black.  I'm pretty far behind with practicing and creating so I will tackle this technique again at some point!

One thing I did do after watching Jennifer's video was I taped my paper down onto my nifty Epicurean Handy Board (idea I stole from Jennifer McGuire) and I actually LET THE PROJECT DRY on its own--yes, patience.  The beautiful thing was seeing how the paper was so flat once I released the tape.  Typically I am really working to get my watercolor to lay flat since I'm too impatient to leave it along, but leaving it taped to dry overnight was really a good idea!

Got some new stamps in from Papertrey Ink--loving these brush scripts that are all the rage right now.  Can't wait to see what Winnie & Walter are releasing later this week!


PTI Wet Paint III 2831 $15
Pelikan 24 Color Opaque Watercolor Set
*Tim Holtz DISTRESS WATERCOLOR CARDSTOCK Ranger Ink TDA39549
Whisper White Craft Stampin' Pad 101731
Snail Adhesive 104332
White Stampin' Emboss Powder 109132
*3M Scotch DOUBLE-SIDED FOAM TAPE Permanent
Epicurean 9-by-7-1/2-Inch Handy Board, Slate
*Martha Stewart MEDIUM FOOTED STAMP MOUNT 40-24029 New 2011
InLinkz.com

Watercolor Lettering

5/14/2014

0 Comments

 
Picture
Well, that's it--now I need to find a calligraphy class!  Today's lessons over at the Watercolor Online Card Class were all about freestyle techniques--watercoloring without the use of stamps.  As you can imagine, the challenge to paint without any 'help' is kind of intimidating!  One of the lessons focused on using one's own handwriting so that was the one I attempted first.  I would like to learn more about particular brushes and the advantages over one or another but I will admit I have fast-forwarded through some of the videos and may have missed that--will definitely go back and review them when I have more time.  That's one of the great things about the classes over at Online Card Classes--everything is archived so you can go back to lessons whenever you want!   I pretty much just experimented tonight using several brushes on some scrap paper and ended up using a small round brush though I wasn't that thrilled with my lack of control while writing the letters.  I will have to take time to practice controlling the brush as I paint so that I can get the line width I am wanting instead of just ending up with whatever happens on accident :)  I started by creating a watercolor background on a piece of watercolor paper using some inks from my Pelikan watercolor set.  Once that dried, I added the lettering with black ink from the same watercolor set.  I did not sketch it in pencil first and probably should have--my 'a' was a little too small and I probably could have avoided that by sketching the letters first.  Next time I will take the time to do that.  That card overall is a little plain, but I am pleased with my first lettering attempt and will definitely keep practicing!  Check out Jennifer Rzasa's blog--she's one of the instructors of the class and has lots of great work she shares!  Thanks for popping by!


0 Comments

Watercolor Wonder

5/13/2014

5 Comments

 
Picture
Going into week two of my online Watercolor for Cardmakers class and I must say that I wish I could abandon all other responsibilities and just take the time to focus on the daily lessons and practice new techniques.   Truthfully, a lot of the lessons so far have focused on using stamps with watercolors and I'm much more interested in learning more about watercoloring in general.  I am enjoying watching all of the instructional videos because even if the artists are using stamps, I can learn a little bit about their technique as I watch them paint.  This card here was made for fun because I adored this card by Laura Bassen.  This stamp set is a new favorite by Mama Elephant--they're releasing another sentiment with this script and I can't wait to get it!

Picture
Now, take a look at this gorgeous card I got from my friend Jen for my birthday--her MOM made it!  Judy Hearon is a watercolor artist and made some of these beautiful cards for her daughter and I am so lucky to have gotten one!  I was blown away by it when I opened it!  Having just gotten into watercoloring myself, I would love to learn more about brushes to use for different looks and really just how to achieve natural lines.  I feel like my watercoloring looks very 'forced' and unnatural which is the opposite of what I want!  Judy's card is just stunning and I hope my friend Jen gets some painting lessons from her mom so she can share some techniques with me :-)

Picture
To give you an idea of what I mean by my paintings looking 'forced', here is an example of a rose I painted today with the help of a stamp.  I used an outline rose stamp which I stamped lightly using Tim Holtz Distress ink in Picked Raspberry.  I didn't have any 'filler' stamp images to help with the painting so I just started by pulling color from the lines of the stamped image with a wet brush and then added some orange and a little more pink to help add some variation. I went back it with some white because I felt like the petals were kinda blending into one another and I needed some 'light'.  I would love to learn more about shading and light because I love seeing how artists like Judy get their pieces to look so natural.  I tried mimicking her leaves and failed miserably LOL!  Again, I'm sure knowing more about brushes would help.  I kinda overworked the leaves...there was a stage where they didn't look too bad and I should have left them alone, but I kept going.  Sometimes, ya just need to know when to stop!  I added some splatters of paint in both pink and green and then added my sentiment once the watercoloring dried.  I just LOVE the lettering in this Winnie and Walter stamp set.  

Before I go, I want to share this impulse purchase that has turned into one of my favorite finds.  I was at Hobby Lobby a few weeks ago and saw these brush cleaning tank and I decided to use a 40% off coupon and get one. I tell you--having this metal coil in the bottom of the jar really helps my brushes get cleaner a lot faster and with minimal effort.  I paid $6 for it which I didn't think was too bad though after looking for one online to link here I see that is pretty much the going rate without a coupon ;-). There was another less expensive one with a different kind of metal bottom but something about the coil just stood out to me--I felt that it would be easier on the brushes in the long run but that was just my novice impression.  I sure do love it though!

Picture
Silicoil Brush Cleaning Jar (I think I paid about $6 if memory serves me right)

Picture
Mona Lisa Brush Cleaning Jar (only a few dollars using a 40% off coupon)
Whew!  That was quite the post--congratulations if you made it this far.  Thanks for stopping by!
*RESERVE Mama Elephant Clear Stamp MAKE A WISH Set ME1403-065
*RESERVE Winnie & Walter THE BIG THE BOLD AND THE HAPPY Clear Stamps
Basic Black Smooth Cardstock 121045
*Tim Holtz DISTRESS WATERCOLOR CARDSTOCK Ranger Ink TDA39549
Pelikan 24 Color Opaque Watercolor Set
*Tim Holtz DISTRESS INK PAD PICKED RASPBERRY Ranger SUMMER
*VersaFine ONYX BLACK Ink Pad Pigment
*3M Scotch DOUBLE-SIDED FOAM TAPE Permanent
Snail Adhesive 104332
*Martha Stewart MEDIUM FOOTED STAMP MOUNT 40-24029 New 2011
InLinkz.com
5 Comments

Go on and Celebrate!

5/10/2014

0 Comments

 
Picture
I'm not in love with this card, but I am in love with the stamp set I used!  I heat embossed the sentiment over a background that I watercolored using some Pelikan watercolors I had to get after seeing them on Kymona's blog.  While I have never actually met Kymona, she is one of those crafting bloggers I believe would be someone I could be great friends with in real life--she has a daughter close in my age and they love crafting together like Madeline and I do.  For this reason alone, I believe we could be real-life crafting BFFs.  She used these watercolors and I just loved the bright colors.  Now, after doing a sample of these colors along with my Sakura Koi Sketch Box, I will admit there is some overlap and a lot of similar colors, but there is enough variety there that I'm happy to have both sets.  Like a card I shared a couple of weeks ago, I used my watercolors to paint a piece of grosgrain ribbon so that it would match the card--easy to do and can be done with Stampin' Up! inks as well!

The stamp set I used is one that I have been waiting on for OVER A MONTH and am so glad to finally have it.  I think Mama Elephant is releasing another set later this week with the same calligraphy so I will have to check their site--I will not be trying a 'reserve item' order again seeing I am rather impatient ;-) 
  

Pelikan 24 Color Opaque Watercolor Set
*Neenah Classic Crest **110 LB** SMOOTH SOLAR WHITE Paper Pack 25 Sheets
Basic Black Smooth Cardstock 121045
*RESERVE Mama Elephant Clear Stamp MAKE A WISH Set ME1403-065
Tombow Multi Glue (SU! 110755)
Snail Adhesive 104332
*3M Scotch DOUBLE-SIDED FOAM TAPE Permanent
Whisper White Craft Stampin' Pad 101731
White Stampin' Emboss Powder 109132
Sizzix Big Shot 113439
Magnetic Platform 130658
InLinkz.com
0 Comments

Watercolor Pencils

5/9/2014

4 Comments

 
Picture
One of the techniques discussed in class was watercoloring with the use of watercolor pencils.  I just got this Lawn Fawn stamp set and knew I wanted to use it for a card for my grandpa so I decided to watercolor the states so that I could practice this technique.  I saw a card sample at The Paper Forest where they had used what looked like Copics to color the states.  I figured I could get a similar look so I dusted off my watercolor pencils from Stampin' Up! and got to work.  Now, these pencils are at least 10 years old and I found that they do not work all that well on actual watercolor paper so I'm not sure I should even keep them at this point.  I couldn't really get the ink to blend without a lot of effort and it still has a colored pencil look more than a watercolor look.  Perhaps I should have stamped and colored on the smoother side of the paper--I don't know.  I believe my grandpa will be 93 at the end of this month...or is it 94?!  Either way, I'm hoping he won't notice the poor ink blending/coloring :-)  

The teachers in the watercolor class all seem to recommend Derwent Inktense pencils if there is anyone out there wanting to purchase a product to try this technique.  I thought of it afterwards but Madeline got some watercolor pencils as part of a big art set from Santa this past Christmas so I just may give those a whirl later to see how they work compared to these SU! pencils.  

*PRE-ORDER Lawn Fawn WISH YOU WERE HERE Clear Stamps
*PRE-ORDER Lawn Fawn WISH YOU WERE HERE Lawn Cuts Dies
Tombow Multi Glue (SU! 110755)
Snail Adhesive 104332
Sizzix Big Shot 113439
Magnetic Platform 130658
Basic Black Smooth Cardstock 121045
Melon Mambo 8.5" x 11" Card Stock 115320
*Neenah Classic Crest **110 LB** SMOOTH SOLAR WHITE Paper Pack 25 Sheets
*VersaFine ONYX BLACK Ink Pad Pigment
Stampin' Up! Aqua Painter 103954
InLinkz.com
4 Comments

Stampin' Up! & Watercoloring

5/9/2014

0 Comments

 
Picture
There's so much hype in the industry over Tim Holtz Distress Inks (and I do love them) but as I'm working on projects for this online watercolor class I am taking, I think of how Stampin' Up! inks are really well-suited for watercoloring.  'Back in the day' when many of us began stamping, we did all of these watercolor techniques with SU! products--inking and misting stamps, using ink with our aqua painters--been there, done that!  So, now that this watercolor trend is coming back, it's time to dust off those Stampin' Up! watercolor pencils and other supplies and get to work! 

For this card, I started with the blue background which I created using a large SU! acrylic block and some watercoloring I did right on the block.  The block was 'smooshed' onto the watercolor paper and voila--nice rectangular background.  For the main image I was struggling to find something.  I have gotten rid of a lot of stamps over the years so unfortunately, I didn't have much to work with when it came to this technique of coloring and misting a stamp to get a watercolor image.  Upsy Daisy is a retired set that I absolutely loved so I kept it and was able to use it along with my Stampin' Up! markers for this card.  I colored the stamp and then misted it with water.  I probably should have sprayed my paper a little bit as well because my first impression wasn't too good.  I ended up going back in with a damp paintbrush and moved the color around a bit so that they 'watercolor' look would come to life.  With Mother's Day coming up this weekend, I decided to make this for my mil though it will arrive late (better than never?).  The sentiment is from an older Papertrey Ink set  called Women of Life.    Looking forward to seeing what today's techniques are in class!

Marker colors used on this card: Melon Mambo, Tangerine Tango, Daffodil Delight and Garden Green

Snail Adhesive 104332
Stampin' Up! Aqua Painter 103954
SU! Clear Block E 118484
SU! Many Marvelous Markers 131264
*Tim Holtz DISTRESS WATERCOLOR CARDSTOCK Ranger Ink TDA39549
InLinkz.com
0 Comments

Sprinkles!

5/9/2014

1 Comment

 
Picture
Betsy Veldman really knocked it out of the park with this Shakers and Sprinkles kit!  I am almost embarrassed to own it because having it in my hands basically means I am a complete nut job who stayed online for hours while Papertrey Ink's website crashed repeatedly as thousands of crazed crafters tried ordering this kit!  I joked with my friend Kim that the weak would die off and that we would prevail and luckily, we did.  I got a set and then kept trying to get her one as well since she wasn't having any luck getting through.  Because of the effort entailed in getting this kit, I vowed that I would put it to use immediately so that it didn't sit and just take up space.  My first impression when I opened the kit was that it was money well-spent.  I just love everything about it!  The linen papers are beautiful and all of the little details in packaging the tiny sprinkles is just adorable.   

Here's a picture from Papertrey Ink so you can see how cute this kit is!  The little bottles with cork for all of the sprinkles are probably my favorite part :-)  Let's talk about making the cards.  I will say my first attempt was probably a bit disastrous because I didn't really follow directions.  After messing up, I watched Betsy's video and then attempted the second card which went much better.  Some funny things that happened during the making of the first card--cutting the wrong size rectangle for the back, gluing the transparent sheet down and then realizing I forgot to add the sprinkles, tearing it apart and adding the sprinkles and then sealing it back up to find there's an eye lash in there as well--OMG, I laughed so hard and just left it there!  
Picture
Picture
For the 2nd card, I had a little more experience but I made some bad changes.  I used black ink to stamp the sentiment in the background which I didn't like as much as the Olive on the first card.  I also used way too much 'sprinkle' stuff on the inside of the card.  I added chunky glitter which really just stuck to the transparency so I don't know that I would do that again.  A little really does go a long way!  My neighbor is turning 12 today and so I really thought this would be a great card for her and I know that all of my little criticisms of it won't even be noticed by her :-)   My daughter came home from school and just gasped when she saw it--she thought it was so much fun! I think I will be making a bunch of these to keep on hand for kids' birthdays.


1 Comment

Watercolor Class!

5/6/2014

3 Comments

 
Picture
My Online Watercolor Class has finally started and as luck would have it--I've been pretty busy!  I found some time to watch some of the technique videos last night and then tried a couple of them this morning before running to work.  I was some other pieces drying at home and hope to work on some other projects tonight.  For this card, I tried a technique shown by Laura Bassen that used Tim Holtz Distress Inks, a water mister and an acrylic block to create this watercolor background.  No paints or brushes needed!  I ended up with a background that was a little crooked on my watercolor paper so I ended up trimming the piece (a little shorter then I originally intended) and mounted it onto a piece of Old Olive card stock using foam tape.  I added the sentiment by using a combination of a stacked diecut and stamped image I heat embossed in white.  I'm not loving this on the Olive background, but I wasn't loving it on white either so maybe I'll try yellow.  I kinda botched up the olive ink and that stripe ended up being a lot narrower than I intended so I thought the olive cardstock would be a good choice, but as I'm looking at the picture I'm thinking maybe yellow would be a good option.  We'll see!  I'm so excited about this class and can't wait to see what else I learn.  

SSS Sakura Koi Watercolors Sketch Box (24)
Stampin' Up! Aqua Painter 103954
White Stampin' Emboss Powder 109132
*Simon Says Stamp YOU Craft Die S146
*Simon Says DIE & STAMPS SET EXPRESSIONS FOR YOU SetEFY11
*Tim Holtz DISTRESS WATERCOLOR CARDSTOCK Ranger Ink TDA39549
SU! Old Olive Cardstock 100702
Whisper White Craft Stampin' Pad 101731
*Tim Holtz DISTRESS INK PAD PICKED RASPBERRY Ranger SUMMER
*Tim Holtz DISTRESS INK PAD SQUEEZED LEMONADE Ranger SPRING
*Tim Holtz Distress INK PAD SHABBY SHUTTERS Green Ranger
*Tim Holtz DISTRESS INK PAD PEACOCK FEATHERS Ranger SPRING
*Ranger Inkssentials MINI MISTER Spray Bottle Ink Rubber Stamp Tool
SU! Clear Block C 118486
Tombow Multi Glue (SU! 110755)
*Martha Stewart MEDIUM FOOTED STAMP MOUNT 40-24029 New 2011
InLinkz.com
3 Comments
<<Previous
    Picture

    Author

    Karen Kelly
    Papercrating since 2000
    Find my previous blog HERE.
    Find my daughter's blog HERE.

    Archives

    February 2016
    January 2016
    May 2014
    April 2014
    March 2014
    February 2014

    Categories

    All
    PLxSU

    RSS Feed

    Favorite Designers

    Kristina Werner
    Julie Ebersole
    Jennifer McGuire
    Cristina Kowalczyk
    Laura Bassen
    Emily Leiphart
    Shari Carroll
    Kelly Purkey
    Dawn McVey
    Debby Hughes

    Favorite Places to Spend $$$

    Stampin' Up!
    Kelly Purkey
    Simon Says Stamp!
    Papertrey Ink


    Published Work

    Cards Magazine, 8.08
    Cards Magazine, 9.08
    Cards Magazine, 10.08
    Picture
    Picture
    Picture
    Picture
    Picture
    Picture
    Picture
    Picture
    Simon Says Stamp
    w&w_blogblinkie
Proudly powered by Weebly